Translate

14 January 2014

Using the digital caliper

I have now used the General® UltraTech™ Fraction+ model #1433 3-inch digital caliper (UPC 0-38728-01433-7) a few times and am not impressed.

The first thing I did was use it as a converter.&npbs; I needed to know how many millimeters in an inch.  Because the tool does not have a fine-adjustment wheel, I kept missing the 1-inch mark.  It took several minutes to finally coax the decide to exactly 1 inch.  Those are minutes I will not get back.

Later, I needed to determine how wide something was.  I opened the calipers and used the outside jaws to place them.  However, I forgot to turn the unit on, so I pressed the on button and remeasured.  The number that appeared was much smaller than what the piece looked like.  Fiddling with the caliper, I noticed that there was sometimes a negative distance.  I turned the unit off and on again to confirm my suspicion.  Sure enough, the unit starts at zero no matter how far the caliper is spread.&nbps; To get a true measurement, one has to close the caliper and zero it out, just like taring a scale to zero.  Hence, every time I use the caliper, I have to press it closed and hit zero before measuring.  This is a little bit of an inconvenience and, therefore, an annoyance.

I will post again when I have used the item more.

As always, I welcome your comments.  Click on the Comment link below; it may say "No" or have a number in front of it.

References:

Digital calipers for jewelry making

As part of my jewelry making projects, I determined I needed a digital calipers to help in the sizing of items.  A trip to the Lowe's was almost a bust, until the floor clerk “remembered” they carried a line of precision tools.  Thus, I was introduced to the General® UltraTech™ Fraction+ model #1433 3-inch digital caliper (UPC 0-38728-01433-7), paying $18 plus tax.  They also have a 6-inch model, but I chose the 3 inch because my measurements should all be rather small.  The measurements display digitally in either fractions of an inch, decimals of an inch, or decimals of millimeters.

The tool comes in one of those impossible-to-open sealed plastic containers.  In fact, the container was so well sealed that I tore the manual upon removing it.  Opening the package released a paint-like smell, which I found unpleasant.  The tool comes with a plastic case that has a shaped foam insert in which to place the tool.  It is this foam that is giving off the smell.  The case has a pressure-release clasp and clear plastic hinges.  Even the caliper jaws are plastic; this could cause problems in the future due to wear and erosion one would not experience with an all-metal tool.

The manual itself is only four pages.  As always, I performed a scan of the manual so I couldn't lose it and uploaded it to my shared Google Drive, which you can click here to view.  The first page is just the front cover art.  The two inside pages consist of a diagram of the device with lettered arrows and the names of those parts, although some of those parts are mislabeled.  There is very little explanation of how to actually use the device.  They do not even say what kind of battery it requires, only that one is to “puch cover upward to access battery”.  It should be noted, though, that the battery has an expected life of 3 years under “normal on/off conditions”. Also, there is no stated warranty.&nbps; If the device fails, I guess I lose my $18 with no recourse.

At this point, I would have to say I am disappointed with the tool  It feels cheap and is not properly documented, and it literally stinks.  There are three buttons to control the digital display but nothing to control the movement of the caliper or lock the caliper in place, in the event I wish to do the measurement first.  I am hoping I get good life out of this device, but I am not counting on it.  I will blog more posts as I actually use the tool.

As always, I welcome your comments.  Click on the Comment link below; it may say "No" or have a number in front of it.

References:

04 January 2014

Ninja, a re-enactment

I finally got around to doing the re-enactment of the Ninja™ Master Prep™ Professional peanut butter video (available on YouTube).

I must say, the results were quite eye-opening.  First, using the oil created a more liquid product than I got from using the almonds.  The problem with that is the final result wasn't so much peanut butter as peanut soup.  In fact, it is still quite liquid after being in my refrigerator for about a week now.  So, the demonstration was accurate to a point.  What I need to do now is adjust the proportion of nuts to oil, and I should be able to create more nut butters.

As always, I welcome your comments.  Click on the Comment link below; it may say "No" or have a number in front of it.

31 December 2013

Planted Green Onion, week 2

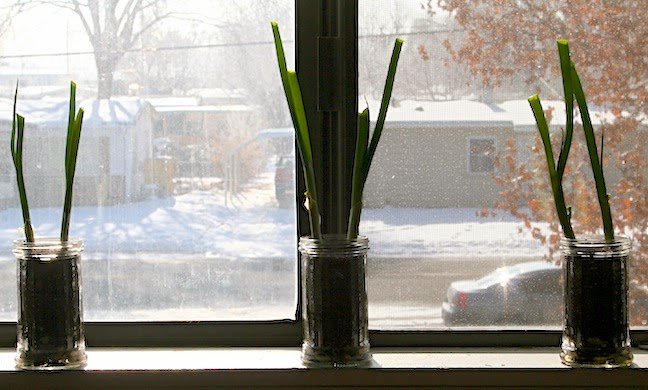
The Monday of week #2 didn't see any new growth.  In fact, the ends where I clipped the leaves are already starting to shrivel again.  Am I supposed to be cutting off the entire leaf?

Tuesday saw no real significant change, although the two plants on the right continue to grow.  The one on the left seems to have slowed down significantly.
Here are close-ups of the plants.  This does really demonstrate how the plant on the right seems to have stopped growing.
On Thursday, I noticed roots in the two jars on the right.  The left jar did not have any roots.  We shall see how things look again next week.

As always, I welcome your comments.  Click on the Comment link below; it may say "No" or have a number in front of it.

Faux mercury glass, a test

As part of my utensil holder project, I thought it would look neat to use faux mercury glass, so I went out to the web to investigate the technique.  It seems there are two prevailing schools of thought on this.  The folks at the White Picket Bentz blog advocate spraying the dry surface inside a glass container with looking glass paint, following this with a spray of 1:1 vinegar and water, then popping the resulting bubbles.  The folks at the 17 Apart website, on the other hand, advocate spraying the dry surface outside a glass container with 1:1 vinegar and water, immediately spraying with looking glass paint, spraying again with vinegar/water, then dabbing the surface dry before adding more coats.  What this means is I have four different methods to test.
I decided to give the 17 Apart method first, spraying the outside of the jars.  These pictures are of the glass with 1, 2, and 3 coats, respectively.  Not a bad look.  You can click on them to see them larger.
Here are the pictorial results from using the White Picket method of spraying inside the jars.  After the first coat, I was really not happy with the result, so even though the method did not call for coats, I added coats 2 and 3.  Again, you can click on the picture to get a larger version.  To me, the White Picket method resulted in a more translucent coloring than the 17 Apart method.
Here is a side-by-side comparison.  The inside method (on the left) seems to be reflecting more light than the outside method (on the right).  This is a quality of the looking glass paint, which does recommend spraying on the inside to create the reflective surface.  Comparing my photos to the reference photos, the pictures on the White Picket Bentz website show a more completely painted surface.  However, I kind of like the look of the outside method better.  It seems more antique, so I am going to do an additional test using copper paint.
Using the outside method, I sprayed with copper metallic paint rather than looking glass.  Above are the results for 1 coat and 2 coats, respectively.  Using the copper, unfortunately, gets rind of the glass appearance of the silver sprays.  I'm wondering if I should try doing the inside method with the copper, but I want to use the inside of the jar to store my utensils, so that might be a bad idea.
Here, then, are the jars 4 hours later.  The first jar is unpainted, the second is the copper, the third is the inside silver, and the fourth is the outside silver.  I do like the shininess of the looking glass paints, though the copper may coordinate more with the rest of the utensil holder.  I think I will look for a food-grade sealer I can spray into the jar.  If I find one, then I will do an inside test on the copper; if not, I am leaning toward the outside silver.

As always, I welcome your comments.  Click on the Comment link below; it may say "No" or have a number in front of it.

29 December 2013

Review of Anchor sharp knives

Back when I moved into a new apartment after being homeless, I needed a set of sharp knives.  I came across the Anchor Home Collection™ 6-piece knife set with cutting board (UPC 0-48676-95873-7) at the local Big Lots.  It was only $8, so I thought I would give it a try.
I was surprised at how stiff the blades were.  Dollar Tree sharp knives are very flexible; these were nicely stiff, meaning they would not bend during cutting.  They rivaled my few remaining chef blades from cooking school.  They also had full tang inside the riveted handles.  The handles themselves are a very cheap-feeling light-weight plastic.  It is a very unsatisfying feel compared to riveted wooden handles.  However, they do give the longer knives a nice center of gravity just in front of the handle, which is great for those of us who grip the knife at that location, like the picture below.
The three things I don't like about this set:  1) The cutting board that is the sixth piece of the set is a thin plastic piece of crap that I will probably end up cutting through if I used.  I will stick with my wooden cutting board.  2) The outline of the tang does not always match the outline of the handle.  Sometimes there is metal sticking out, and sometimes it is recessed, creating a good place for water and germs to pool.  I've already had to remove rust from one of the knife tangs.  3) In the picture below, you can see odd waves in the blade.  I presume this is where the machine sharpened the steel.  Waves usually mean the machine was not operating properly, like it was going too fast for the lubrication present.
In conclusion, I am quite satisfied with this purchase.  I have not had any real problems with the knives other than the one appearance of rust on a tang.  In fact, I use what they call the carving knife to slice home-made bread, and it does not crush the loaf.  I would call this an acceptable frugal buy.

As always, I welcome your comments.  Click on the Comment link below; it may say "No" or have a number in front of it.

Count the Mondays next month

To count the number of Mondays in a month in an Excel cell, use the following formula:

=sumproduct(--(weekday(row(indirect((eomonth(today(),0)+1) & ":" & (eomonth(today(),1)))))=2))

In December 2013, this returns 4 because there are 4 Mondays in January 2014.  How do you alter the formula for any day of the week?  Change the 2 at the end of the formula to the number corresponding to the day of the week:
  • Sunday = 1
  • Monday = 2
  • Tuesday = 3
  • Wednesday = 4
  • Thursday = 5
  • Friday = 6
  • Saturday = 7
For example, changing the 2 to 6 in December 2013 would result in the number 5, as there are 5 Saturdays in January 2014.

As always, I welcome your comments.  Click on the Comment link below; it may say "No" or have a number in front of it.

Count the Mondays this month

To count the number of Mondays in a month in an Excel cell, use the following formula:

=sumproduct(--(weekday(row(indirect((eomonth(today(),-1)+1) & ":" & (eomonth(today(),0)))))=2))

In December 2013, this returns 5.  How do you alter the formula for any day of the week?  Change the 2 at the end of the formula to the number corresponding to the day of the week:
  • Sunday = 1
  • Monday = 2
  • Tuesday = 3
  • Wednesday = 4
  • Thursday = 5
  • Friday = 6
  • Saturday = 7
For example, changing the 2 to 6 would result in the number 4, as there are 4 Saturdays in December 2013.

As always, I welcome your comments.  Click on the Comment link below; it may say "No" or have a number in front of it.

Name of next month

To display the name of the next month in an Excel cell, use the following formula:

=text(now()+day(now()),"mmmm")

As always, I welcome your comments.  Click on the Comment link below; it may say "No" or have a number in front of it.

Add text after a formula

To add more text to a formula result in an Excel cell, put an ampersand (&) outside the end of the formula, then put a quotation mark (").  Type in your additional text, then close with another quotation mark (").  For example:

=text(now()-day(now()),"mmmm")&" paycheck"

This will returned the name of the month followed by the word paycheck.  In December, it returned December paycheck.  Note that there is a space after the first quotation mark.  That is so there is a space between my result and my text.  Without it, I would get Decemberpaycheck.

As always, I welcome your comments.  Click on the Comment link below; it may say "No" or have a number in front of it.

Name of previous month

To display the name of the previous month in an Excel cell, use the following formula:

=text(now()-day(now()),"mmmm")

As always, I welcome your comments.  Click on the Comment link below; it may say "No" or have a number in front of it.

Name of the current month

To display the name of the current month in an Excel cell, use the following formula:

=text(now(),"mmmm")

As always, I welcome your comments.  Click on the Comment link below; it may say "No" or have a number in front of it.

25 December 2013

What I didn't know I didn't know about toffee

Spending all that time writing the truffle post made me think of the old peanut brittle post I did.  It has been languishing on another blog since being created, so I thought I would take the time to reformat it and post it to this relatively more popular blog.

What is the difference between toffee and brittle?  Both are slabs of crunchy candy, so where do the differences lie.

Toffee:  The first recording of the spelling toffee was in 1862, although other spellings existed as early as 1825 (“Online”).  It is believed to be a dialectical variation of taffy (“Taffy”), which itself is a dialectical word originating in 1817 and may have derived from tafia, a molasses liquor made in the West Indies (“Online”).  It is suggested that this is shortened from the West Indian Creole French word ratafia (“Online”) meaning a fruit or nut liqueur (“Ratafia” Dictionary.com) described as "fruits or nuts . . . steeped in a sweet spirit base (“Ratafia” US Restaurant Alliance) or a liqueur made from brandy with fruit juice, fruit, and/or wine added (“Ratafia” Free Dictionary).  The theory is the original candy was made as a bi-product of the wine production (“Online”).  In Britain, both hard and soft toffees are available.  Soft toffees are what we in The United States would call caramels (Oulton “Toffee”), though some classify them more like taffies (“What”).
An Internet search turned up this photo of Walker's Nonesuch Original Toffee.  In my opinion, this looks very much like American caramels.  Of course, I had to try some, but before ordering from Amazon, I decided to check out a local shop called British Home Shoppe.  After surveying items like canned rhubarb, I found the candy section.  There were many candies I have never heard of and will be back in the future to purchase.  However, I found the Walker's toffee for $2.50 and proceeded to the counter.  After paying for the toffee, the man behind the counter asked if I wanted him to hammer the toffee.  Apparently, part of the British toffee experience is hammering the toffee before unwrapping.  I passed on the hammering experience and took the toffee to the car.  Here is a picture of a toffee hammer.
Upon unwrapping, it was, indeed, very much like caramel but denser.  I had no trouble chewing it, although it did seem to have the consistency of taffy.  Maybe using the hammer is an English dental thing?  Anyway, U.S. caramels do seem much softer and easier to chew.  How did the candy taste?  It was buttery.  However, I had no problem eating it without the use of a hammer.  By the by, those toffee hammers were also used by suffragettes in the early 1910s to smash shop windows as a political protest.  This was the weapon of choice because the small toffee hammers could be easily hidden (“Toffee hammer”).  To this day, there are stores in England that will not sell a toffee hammer to a minor (Bennett).

Like toffee traditions, toffee recipes also differ between countries.  Here, we use white sugar and flavorings, whereas in Britain, the recipe is brown sugar or molasses, butter, and water (Oulton “Toffee”), although I am sure there are many variations I have not come across yet.  Americans beware here, because what we call English toffee is not English at all.  It is toffee with coatings, such as chocolate and nuts (Chu).  This type of candy is known in England as a buttercrunch (“Difference”).

Brittle:  The candy term brittle is said to have appeared in 1913 (“Brittle”), although the confection does make its appearance in 19th century American cookbooks (Polaski).  In fact, brittle-style candies are said to go way back in history, from an 1847 recipe for groundnut candy to as far back as the halva confection of 16th century Arabia (Olver).  When one reads the 1847 recipe, it sounds an awful lot like a recipe for toffee.  It consists of boiling molasses, brown sugar, and water and then adding nuts.  One change since then has been the addition of baking soda to the recipe to aerate the confection and make it easier to chew.  The exact timing of this event is not known to me, but it seems to have taken place some time between 1919 and 1942, based on historic recipes (Olver).  So until that time, there was very little difference between brittle and toffee.

The Walker's website does help to clarify a few of definitions.  The plain candy is referred to as original or creamy toffee, which is the caramel-like candy I purchased.  When nuts are added to the soft toffee, Walker's changes the name from original to English.  Great.  Just when I accepted that English toffee was an American candy bar, Walker's gives the same name to caramel filled with nuts.  The hard toffees offered by Walker's are peanut brittle and sesame crunch.  This proves toffee with something in it should have a different name.  Add nuts, and it becomes a brittle.  Add seeds, and it becomes a crunch? Well, the Walker's Crunch also has chocolate on top, so the topping makes it a crunch, like plain [butter] toffee is called a buttercrunch.

Where, then, do pralines [the New Orleans kind, not the Belgian] fit into all this?  After all, they are nut-filled sugar confections.  Well, based on the recipes I have reviewed, there are three differences between a brittle and a praline.  A brittle recipes uses water, whereas a praline recipe uses milk products, such as milk, evaporated milk, cream, and half-and-half.  French pralines were simply candy-coated nuts.  When these arrived in Louisiana, local pecans were used and cream was added, making the confection more fudge-like than brittle (“Praline”).  The second difference is cooking temperature.  Brittles are taken up to hard crack stage, over 300°F, but pralines stay in the soft ball stage around 240°F (“Candy-making”).  The last difference I have discovered is a brittle is poured to cool and then broken into bits but a praline is spooned out like a cookie.  In fact, Christensen calls pralines cookies instead of candies.

In Conclusion:  Brittle and toffee seem to have the same ancestors in candy making history.  Technically speaking, a toffee recipe will not include a leavening agent, but a brittle will, most often baking soda.  A brittle will be untopped, while a toffee can be coated with chocolate and nuts.  This is an English toffee in the States and a buttercrunch in the Kingdom.  On the other hand, toffee will have no added ingredients beyond sugar, fat, and water; but brittle can have various additions, from seeds to nuts, and should have no topping.  I have even seen recipes for jelly bean and candy corn brittle.  Brittle with milk and spooned out is a U.S. praline.

A few points about butter toffee before I close.  Butter toffee just means butter was added as part of the recipe.  The English recipes normally have butter; the U.S. recipes normally do not.  Just add butter, and you have butter toffee.  Butterscotch is butter toffee not cooked to a high enough temperature (Chu; Oulton “Toffee”).  Soft or creamy toffee is cooked to a lower temperature, and caramels are cooked even lower than that.  For my family, butter brickle is simply butter toffee.  The recipe on Cooks.com lists sugar, butter, and water; and Oulton (“Butter Brickle”) states, “Brickle is just an old English variant on the word brittle.”  This is confirmed by The Free Dictionary (“Brickle”).

As always, I welcome your comments.  Click on the Comment link below; it may say "No" or have a number in front of it.

References:

Bennett, Derek. “Why Can't Under Sixteens Buy Toffee Hammers?” Derek Bennett, The Euro Sceptic. N.p., 23 Dec. 2010. Web. 25 Dec. 2013.

“Brickle.” The Free Dictionary. Farlex, Inc., n.d. Web. 25 Dec. 2013.

“Brittle.” Merriam-Webster Online. Merriam-Webster, Incorporated, n.d. Web. 25 Dec. 2013.

“Butter Brickle Candy.” Cooks.com Recipe Search. Cooks.com, n.d. Web. 25 Dec. 2013.

“Candy-making Stages: The Cold Water Candy Test.” The Accidental Scientist: Science of Cooking. Exploratorium, n.d. Web. 25 Dec. 2013.

Christensen, Emma. “Make Perfect Pralines: Five Secrets from a New Orleans Pro.” The Kitchn. Apartment Therapy, 23 June 2011. Web. 25 Dec. 2013.

Chu, Michael. “English Toffee.” Cooking For Engineers. CFE Enterprises, Inc., 5 Feb. 2006. Web. 25 Dec. 2013.

“The Difference Between Buttercrunch & Toffee.&lduo; The Nibble. Lifestyle Direct, Inc., June 2012. Web. 25 Dec. 2013.

“Online Etymology Dictionary.” etymonline.com. Douglas Harper, n.d. Web. 25 Dec. 2013.

Olver, Lynne, ed. “Food Timeline FAQs: Candy.” The Food Timeline. Lynne Olver, 8 Dec. 2013. Web. 25 Dec. 2013.

Oulton, Randal. “Butter Brickle.” CooksInfo.com. CooksInfo.com, 2 Dec. 2007. Web. 25 Dec. 2013.
-- “Toffee.” CooksInfo.com. CooksInfo.com, 14 Feb. 2011. Web. 25 Dec. 2013.

“Pecan Pralines Recipes.” Southern Living. Time Inc., n.d. Web. 25 Dec. 2013.

Polaski, Helen. “The History of Peanut Brittle Candy.” Life123. Life123, Inc., an IAC Company, n.d. Web. 25 Dec. 2013.

“Praline.” Wikipedia, the free encyclopedia. Wikimedia Foundation, Inc, 27 May 2013. Web. 25 Dec. 2013.

“Ratafia.” Dictionary.com. Dictionary.com, LLC, n.d. Web. 25 Dec. 2013.

“Ratafia.” The Free Dictionary. Farlex, Inc., n.d. Web. 25 Dec. 2013.

“Ratafia.” US Restaurant Alliance. The U.S. Restaurant Alliance®, n.d. Web. 25 Dec. 2013.

“Toffee.” Wikipedia, the free encyclopedia. Wikimedia Foundation, Inc, 19 Dec. 2013. Web. 25 Dec. 2013.

“Toffee hammer used by militant suffragettes: c.1911.” Museum of London Online Store. Museum of London, n.d. Web. 25 Dec. 2013.

“What is English Toffee?” wiseGEEK. Conjecture Corporation, n.d. Web. 25 Dec. 2013.

What I didn't know I didn't know about truffles

We all know that truffles, those bite-size chocolate candies, are named after the mushroom because of their similar appearance.  However, the origin of the first chocolate truffle is disputed.  Although most sources claim truffles were created in France (Hochman “History”, Thornborrow), stories of how the truffle was created differ.  One such story is an apprentice of Escoffier accidentally poured hot cream in chocolate instead of sugared egg some time in the 1920s (Hochman “History”), albeit the same author claims in a different article this happened in the 19th century (Hochman “What”).  The 1920s time frame is echoed on other websites (Olver) and by the appearance of truffle recipes in cookbooks of the time (Rigby & Rigby 90).  Wikipedia claims the inventor is “N.Petruccelli in Chambéry, France in December 1895.”  However, the website used for the citation no longer exists.  Deitsch verifies most of this information but presents Louis Dufour as simultaneously inventing both ganache and truffles.  Giovannangeli expounds upon the story thusly:
The invention of these luxury chocolate confections is credited to French pâtissier Louis Dufour, who is said to have created the first chocolate truffles in the town of Chambéry (Savoie department) in December 1895 after running short of ingredients while making his Christmas sweets.
Rather than turning to his competitors to purchase supplies, Monsieur Dufour hit upon the idea of mixing together the ingredients at hand — fresh cream, vanilla and cocoa powder —, dipping the resulting confections in melted chocolate and rolling them in more cocoa powder.
The new chocolate treats were an instant success and their popularity remains to this day, notably during Christmas and end-of-year festivities.
To be fair to Wikipedia, neither of the other websites gives a source, and the invention of ganache is placed in the 1850s by other sources (1234; Jaworski).

Wikipedia also claims there are different styles of truffles, although there are no citations for several of them.  [It is interesting how many more types of truffles there are since I first saw that Wikipedia page in October 2011.]  The ones with citations include the Swiss truffle, made with ganache and formed in a mold (Minifie 545).  This is virtually the same as a French truffle, made with ganache and rolled into a ball.  What became known as the California truffle was actually a failure of a French truffle recipe (Barron).  The so-called American truffle is described down to the ingredients even though the citation's author never mentions them (Hallock).  Wikipedia goes on to claim there is a Belgian truffle, yet the cited blog post claims these are pralinés but are called truffles because there is no accented e in the English language (“Pralines VS Truffles”).  Wikipedia uses this blog's commercial website to define Vegan truffles as using “nut butters and oils,” but the website mentions only coconut oil (“Fine Artisanal Belgian Chocolates”).  In contrast to Wikipedia's growing list, the Punchbowl website lists only three styles:  Swiss, European, and American (“Today's”).  This is why Wikipedia is not a valid source when writing college papers.  This also raises another question.  What are the technical specifications for a truffle?

Hallock defines a truffle as “hand-rolled balls of ganache, sometimes dipped in chocolate, often rolled in cocoa powder.  Ganache is a mixture of chocolate and heated cream.”  This truffle definition is echoed Deitsch, Hochman (“History”), LaBau, Olver, and Weston, among others, though Merriam-Webster does not mention ganache (“Truffle”).  That's it, then.  A truffle is made with a ganache center without chunks but possibly flavored and then coated with something, traditionally cocoa powder but sugar, candy shells, spices, and nuts are acceptable.  “Really, the sky is the limit with truffles, as long as they're made with ganache (Deitsch).”  Anything without ganache should not be considered a truffle (Deitsch; Hochman “Truffles”).

We Statesians [I don't want to lump in other portions of the Americas] are simply too lazy to use alternate terms, even though our language has over 1 million words!  I have just discovered, to my chagrin, that this has been going on for almost a century, as a recipe for chocolate truffle with vanilla cream center appeared in a 1920s cookbook (Rigby & Rigby 90).  Truffle did not appear in the 1909 version of the book (Rigby), although it did contain the same instructions for making chocolate-coated confections.  Apparently, one simply rolls the confection in coconut to make it a truffle.  [Just as a personal aside, it is also interesting to note that these are the only two editions of the book that have survived even though they got up to the 13th edition.]

Unfortunately, I may have to take back that opinion about my countrymen.  Hochman in “Truffles Vs. Pralines: The Difference” explains how the confusion evolved.  In a nutshell, the first chocolate fillings had to be solid, such as nuts.  In 1912, a Belgian chocolatier invented a way to enrobe softer fillings, and he called these confections pralinés, the same word used in Belgium for candied nuts.  The French, on the other hand, called them bonbons, a term coined in the 1770s which means candy (“Bonbon”).  Someone eventually had the idea to use ganache as a filling for candy.  Whether coated with cocoa or enrobed in chocolate, the French called them truffles but the Belgians still called them pralinés.  Now comes the trip across the pond.  Since we already had our own pralinés, which was really a brittle, the Belgian candies were called Belgian chocolates.  The French candies were called truffles.  Both were enrobed in chocolate.  Therefore, all bite-size enrobed chocolates became truffles.  That is why you will sometimes buy a box of chocolate truffles and get fillings like caramel, nuts, or that icky coconut stuff.

In conclusion, a truffle is a bonbon but a bonbon is not necessarily a truffle.  A bonbon in France is a praliné in Belgium.  A praliné in the United States is a brittle but a brittle is not necessarily a praliné.  A brittle in the United States is a toffee in Britain, but that's a different dissertation.  What it all boils down to is there is no governing body for truffles, so any candy maker can call any candy a truffle.

As always, I welcome your comments.  Click on the Comment link below; it may say "No" or have a number in front of it.

References:

1234. “Ganache is discovered in Paris.” ∞timeline. Famento, Inc., n.d. Web. 25 Dec. 2013.

Barron, Cheryll Aimee. “Madam Cocolat.” The New York Times 25 Sept. 1988: n. pag. Print.

“Bonbon.” Merriam-Webster Online. Merriam-Webster, Incorporated, n.d. Web. 25 Dec. 2013.

“Chocolate truffle.” Wikipedia, the free encyclopedia. Wikimedia Foundation, Inc, 20 Dec. 2013. Web. 25 Dec. 2013.

Deitsch, Lauren. “Will the Real Chocolate Truffle Please Stand Up?” Huffpost Taste. TheHuffingtonPost.com, Inc., 4 June 2013. Web. 25 Dec. 2013.

“Fine Artisanal Belgian Chocolates.” Chocolats Meurens New York. Chocolats Meurens, n.d. Web. 25 Dec. 2013.

Giovannangeli, Françoise, ed. “Dark Chocolate Truffles with Cognac and Orange Extract.” ChocoParis. www.chocoparis.com, 2 Jan. 2011. Web. 25 Dec. 2013.

Hallock, Betty. “Sweet surrender.” Los Angeles Times. Tribune Company, 8 Feb. 2006. Web. 25 Dec. 2013.

Hochman, Karen. “The History Of Chocolate Truffles.” The Nibble. Lifestyle Direct, Inc., Dec. 2007. Web. 25 Dec. 2013.
-- “Truffles Vs. Pralines: The Difference.” The Nibble. Lifestyle Direct, Inc., May 2013. Web. 25 Dec. 2013.
-- “What is Chocolate Ganache?” The Nibble. Lifestyle Direct, Inc., May 2013. Web. 25 Dec. 2013.

Jaworski, Stephanie. "Ganache Recipe & Video." JoyofBaking.com. iFood Media LLC, n.d. Web. 25 Dec. 2013.

LaBau, Elizabeth. “Truffles.” About.com Candy. About.com, n.d. Web. 25 Dec. 2013.

Minifie, Bernard W. Chocolate, Cocoa and Confectionery: Science and Technology. 3rd ed. Gaithersburg, Md: Aspen Publishers, 1999. Print.

Olver, Lynne, ed. “Food Timeline FAQs: Candy.” The Food Timeline. N.p., 8 Dec. 2013. Web. 25 Dec. 2013.

“Pralines VS Truffles.” makingchocolates. ChocolatsMeurens.com, 16 Apr. 2011. Web. 25 Dec. 2013.

Rigby, Will O. Rigby's Reliable Candy Teacher and Soda and Ice Cream Formulas. N.p., 1909. Print.

Rigby, Will O., and Fred Rigby. Rigby's Reliable Candy Teacher. 13th ed. Topeka, KS: Rigby Pub. Co, 1920. Print.

Thornborrow, Craig. “A Tasty History of Chocolate Truffles.” EzineArticles. SparkNET, 24 Dec. 2007. Web. 25 Dec. 2013.

“Today's Reason to Celebrate.” Punchbowl. Punchbowl, Inc., n.d. Web. 25 Dec. 2013.

“Truffle.” Merriam-Webster Online. Merriam-Webster, Incorporated, n.d. Web. 25 Dec. 2013.

Weston, Nicole. “What are chocolate truffles?” Baking Bites. N.p., 13 Feb. 2011. Web. 25 Dec. 2013.

22 December 2013

Adventures in bread making

As part of my diet and exercise program, some of my pre-exercise snacks call for whole wheat bread products.  Since these can get a bit expensive, I've decided to try my hand at various forms of bread making.  This one is whole wheat sandwich bread.

I started with the recipe at the An Oregon Cottage website.  Seemed like a simple recipe with basic ingredients.  Upon measuring the first ingredient, however, I was off on a tangent.  It seems my bag of flour weighs more than it says.  A 1/4 cup of flour should weigh 30 grams, meaning a full cup should be 120 grams, but my measuring cup puts a full cup at 160 grams.  Which is correct?  According to the King Arthur Flour website, it should be 4 ounces, which converts to ≈120 grams.  A flour measurement converter available at the Traditional Oven website changes 1 cup of whole wheat flour to 120 grams.  Therefore, I am converting the recipe to 120 grams of flour per cup.

The recipe also calls for “warm water” but does not give a temperature.  Fortunately, the bag of flour I purchased has a recipe, and that recipe gives the degree range for “warm” water.  The water is supposed to be 110°-115°F, so I pulled out my handy dandy Food Network instant read thermometer that I haven’t used since culinary class.  The water coming out of my faucet exceeds 130° degrees.  I tried to get the water to come out at a more precise temperature.  That was futile.  Hence, I put the water in the mixing bowl and am just going to wait for it to get down to the proper temperature before proceeding.

At 112.2°F, I proceeded.  The flour and water are to be combined with the yeast to “sponge.”  A sponge is a pre-fermented dough made as a starter for the final dough, according to the Video Bread website.  It should be thoroughly mixed, whereas my recipe only says combine.  My bread may already be ruined!  At ≈7 minutes into the sponge, I mixed it up; I also rephrased the recipe to indicate it should be thoroughly mixed.  On continuing my sponge investigation, I find the sponge method is actually something that should take place over a longer period of time, from 12-48 hours depending on the recipe.  Again, I shall have to see if this recipe creates a usable product.

With the three ingredients combined, I put them under my paddle attachment.  Within seconds, the dough separated from the sides of the bowl, which the recipe states is the next stage; so I changed to the dough hook.  The recipe says to add tablespoons of flour to keep the dough from sticking to the sides.  After 8 tablespoons of flour, the recipe's maximum, the dough was still sticking to the sides.  I took the dough off the hook at the 7-minute mark, divided it into two 750-gram pieces, and placed the pieces in oiled loaf pans to rise.  The warm place I chose was the top of my refrigerator.

While it is rising, I have gone back to the original website to see if I missed anything.  It has pictures of all the stages.  My bread is nowhere near as nice looking as the pictures.  First, it is apparent that the first three ingredients are mixed thoroughly before proceeding.  They are even already under the paddle attachment, so I am making another change to my instructions to do the combining under the paddle.  Comparing other pictures, I changed to the dough hook at the proper time, but my kneaded dough never achieved the texture of the original loaf.  Perhaps this person used more flour due to using cups rather than scales.  Next time, I will keep adding flour at the end until it achieves the smooth look.

Checking my rising loaves at the 30-minute mark, they are growing nicely.  One of them is already over the top of the pan, so I switched their locations on the fridge to try to keep them even.  At 45 minutes, both loaves are well on their way to the recipe's 1”-2” rise above pan with 15 minutes to go.  Maybe I didn't ruin it after all.  The oven gets turned on in a few minutes.

Now out of the oven, the loaves aren't as high as they need to be for “sandwich” bread, but they thump hollow, so they should be fully cooked.  I will have to extend the rise time next go around.  Upon tasting the bread, it wasn't too far afield from the taste of store-bought bread.  However, I felt quite satisfied, something I never got from store-bought bread.

PS:  Sorry for the lack of pictures.  I was so busy trying to follow the recipe that I didn't snap any shots.  If the recipe works, I will take pictures of the next batch and add them to this post.

As always, I welcome your comments.  Click on the Comment link below; it may say "No" or have a number in front of it.

Ninja: To be fair

Rather than just posting some opinions, I thought I would present a few facts regarding the Ninja™ Master Prep™ Professional.  These facts involve making smoothies with the Ninja&8482;.
This is how a smoothie comes out when made in the Ninja™.  As you can see from the picture, it is a very chunky mix.  This has more of the texture of a shake than a smoothie.  Now, it is possible that one could get the texture smoother by running the motor longer, but that is frowned upon by the user's guide.
This is how a smoothie comes out of my Oster Fusion smoothie blender.  On comparison, the Oster creates a smoother beverage.  To be fair, a bit of the Oster smoothie is air.  By the time the smoothie deflated, both machines made about the same volume of beverage.

Based on these photos and the resulting volume, it becomes a matter of texture.  The Oster makes a smoothie; the Ninja™ makes more of a shake.  To me, that really does not constitute a deal breaker for the Ninja™.  I have other reasons to not like the Ninja, which I have enumerated in my other Ninja&8482; review posts.

As always, I welcome your comments.  Click on the Comment link below; it may say "No" or have a number in front of it.

Planted Green Onions, week 1

Monday's picture shows new growth on 4 of the 6 onions.
On Tuesday, the plants continued to thrive.
Here are some pictures of the new growth on the 2 plants to your right.
Here is Wednesday's picture.  Not really much to explain.  Things continue on.
Thursday's picture didn't show anything out of the ordinary.  There were no new shoots coming up, and the old shoots continued to die off.
I just wanted to take a picture of the longest new shoot.  This is the jar on your left, which seems to have sprouted either quite rapidly or immediately after planting.
Here they are as of Friday noonish of week #1.  As you can see, the growth seems to have stopped, but the onions are still overall green and fresh.

It seems that I somehow forgot to take some pictures on Saturday.

Therefore, on Sunday of Week #1, this is how the onions looked.  Some more of the leaves became brown, but all the onions still had green leaves, meaning none appeared to be dead.  Planted 1 week ago, these green onions appear to still be viable.  I did some clipping to prune back the dead leaves, as appears below.  We shall see if this results in new growth.
And here are some close-ups showing the new growth on 4 of the 6 plants.
At the end of next week, I may pull out one of the onions to see if it is still usable in a recipe.  I will just have to make sure I make a recipe that calls for about ⅛ cup of green onion.

As always, I welcome your comments.  Click on the Comment link below; it may say "No" or have a number in front of it.

19 December 2013

Green Onions, towel & foil method

Another method I have seen for preserving green onions is to wrap them in a paper towel, wrap the paper towel in aluminum foil, and store in the fridge.  So, here we go . . .
A bunch of green onions I bought yesterday (18 Dec. 2013).
Rolling up the onions is paper towels so that they do not touch each other (≈2:30 p.m., 19 Dec. 2013).
Putting them in aluminum foil.
Violà, a green onion joint.

Now, this gets put in the fridge, and it is supposed to preserve the green onions for longer than not rolling them up.  This method is much less expensive than the planting method, but the onions will still eventually be unusable for cooking.  We shall see how long this takes.

As always, I welcome your comments.  Click on the Comment link below; it may say "No" or have a number in front of it.

References:

The Banana Experiment, results and conclusion

So, how do the conventional bananas compare to the organic bananas?

Organic banana came in at $1.04 per pound of usable product.  Conventional banana came in at ≈96½¢ per pound.  That is a 7½¢ savings.  For frugality, the best buy is conventional bananas.

Organic banana had 34.7% waste.  Conventional banana had 38.8% waste.  For less waste, the best buy is organic bananas.  Looks like my cousin might be correct about organic banana peel being thinner is not necessarily the case.

Because of the weight loss difference, there is only a 35¢ increase per pound for the organic bananas while there is a 37½¢ increase per pound in the price of conventional bananas.  This means as one buys more weight of banana the difference per pound will statistically diminish.  If my math is correct, the prices per pound of peeled banana will reach equivalent at 15 pounds.  What this says is buying and freezing 15 pounds of organic bananas should result in the same overall cost (not to be confused with price) and the same amount of fruit as buying and freezing 15 pounds of conventional bananas.  Based on this little experiment, then, I would have to buy about 30 bananas creating 20 bags with 3 halves each.

As a frugalista, though, I know that numbers aren't everything.  When I peeled the organic banana, there wasn't much smell; I recall being disappointed by that and thinking they weren't worth buying anyway.  There was half a banana left over after packaging for freezing, so I tasted it.  It tasted like the banana taffy I like  Well, maybe not as strong, but it definitely tasted like a banana.  When I peeled the conventional bananas, I smelled banana.  This means essential oils (where taste and fragrance come from) were being released into the air.  Upon placing them on the scale, they slid around.  They were a bit oily, which corresponds with the release of scent when peeling.  As with the organic bananas, there was a half left over, so I tasted it.  In contrast with the organic banana, and belying the fragrance, there was almost no banana taste to the conventional banana.  It seems to all have evaporated with the removal of the peel.  Also, there was a starchy mouth feel (also referred to as texture) upon eating and a potato aftertaste with some dry mouth that was a bit annoying and has lasted beyond the time it took to write this post.  I don't recall that happening with the organic banana.

In conclusion, if your only concern is saving money and you purchase in small quantities (1 bunch at a time), buy conventional bananas.  However, buy organic bananas when you want something to actually taste of banana or have enough freezer space to store about 30 bananas.  I cannot comment on whether organic bananas are ecologically more desirable than conventional bananas.

As always, I welcome your comments.  Click on the Comment link below; it may say "No" or have a number in front of it.

The conventional bananas

It is now 5 days since purchasing these bananas from the Sprouts supermarket.

You may recall from the original weigh in that the bunch of conventional bananas weighed 32¼ ounces.
As you can see, they have started to speckle brown.  I don't believe the organic bananas had started to speckle before I peeled them.  However, they had begun to turn dark.  Today, the conventional bananas weigh in at 30¼ ounces.  Allowing them to ripen has resulted in the loss of 2 ounces.  That is 2 ounces I paid for but will never be able to use.  The organic bananas lost the same amount of weight during peeling.  However, the organic bunch was slightly larger, thus there is a higher percentage of loss in the bunch of conventional bananas.  Now, what about after peeling?
Naked, the bananas weigh in at 19¾ ounces.  That is a loss of 10½.  Again referring back to the original post, I paid 59¢ a pound for this bunch of bananas, or a total of $1.19.  Dividing that $1.19 by the remaining ounces means I actually paid 96.4¢ per pound for usable banana, and the percentage of waste is 38.8%.  So, how does this compare to organic banana?  Click here for the exciting conclusion!

As always, I welcome your comments.  Click on the Comment link below; it may say "No" or have a number in front of it.