Translate

Showing posts sorted by date for query ninja. Sort by relevance Show all posts

04 January 2014

Ninja, a re-enactment

I finally got around to doing the re-enactment of the Ninja™ Master Prep™ Professional peanut butter video (available on YouTube).

I must say, the results were quite eye-opening.  First, using the oil created a more liquid product than I got from using the almonds.  The problem with that is the final result wasn't so much peanut butter as peanut soup.  In fact, it is still quite liquid after being in my refrigerator for about a week now.  So, the demonstration was accurate to a point.  What I need to do now is adjust the proportion of nuts to oil, and I should be able to create more nut butters.

As always, I welcome your comments.  Click on the Comment link below; it may say "No" or have a number in front of it.

22 December 2013

Ninja: To be fair

Rather than just posting some opinions, I thought I would present a few facts regarding the Ninja™ Master Prep™ Professional.  These facts involve making smoothies with the Ninja&8482;.
This is how a smoothie comes out when made in the Ninja™.  As you can see from the picture, it is a very chunky mix.  This has more of the texture of a shake than a smoothie.  Now, it is possible that one could get the texture smoother by running the motor longer, but that is frowned upon by the user's guide.
This is how a smoothie comes out of my Oster Fusion smoothie blender.  On comparison, the Oster creates a smoother beverage.  To be fair, a bit of the Oster smoothie is air.  By the time the smoothie deflated, both machines made about the same volume of beverage.

Based on these photos and the resulting volume, it becomes a matter of texture.  The Oster makes a smoothie; the Ninja™ makes more of a shake.  To me, that really does not constitute a deal breaker for the Ninja™.  I have other reasons to not like the Ninja, which I have enumerated in my other Ninja&8482; review posts.

As always, I welcome your comments.  Click on the Comment link below; it may say "No" or have a number in front of it.

17 December 2013

Ninja almond butter test

I am testing the Ninja™ Master Prep™ Professional (their italics, not mine), the ultimate food and drink maker, model #QB1004 30.  In this post, I am specifically using the “bowl”, the smallest unit of this 3-unit set.  This is the piece used in the YouTube video to make peanut butter.  I am going to attempt the same thing with various types of nuts.

Because my first interest is almonds, my first test was with blanched slivered almonds.  I put 1 cup (140 grams) of slivered almonds into the bowl with the 4-blade stem and ran the machine.  At first, it did not seem to do anything beyond pulverize the almonds.  At least, however, I could see the mass moving around the bowl, which is more than I saw with my food processor.  Unfortunately, after several minutes and some really awful squealing coming from the bowl, I still did not have nut butter.  I decided to try something.  I put in a few shots of olive oil and began pulsing the machine.  Sure enough, it started to coalesce into something resembling butter.
Upon tasting it, though, the texture was not the creamy peanut butter we know and love; it was more like an almond pâté or paste, quite akin to marzipan.  Trying several more pulses of the machine didn't improve the texture much.  Since the machine already smelled like it was burning, I decided to end the experiment.  I do have a usable almond pâté, but the machine did not create true almond butter.  How would it spread on bread?
You can really see here the coarseness of this “butter”.  I am spreading it on toast because one of my pre-exercise snacks calls for almond butter on whole wheat toast.
I am not sure if you can see, but the middle of the toast did get kind of squashed while trying to spread the pâté; I'm almost afraid to try it on untoasted bread.  Although usable for my purpose, I wondered if I could improve on the texture, so I decided to re-create the YouTube experiment exactly. First, though, I have to go out and buy a can of peanuts.  The results blog is now available for viewing.

As always, I welcome your comments.  Click on the Comment link below; it may say "No" or have a number in front of it.

The organic bananas

While waiting for my dishwasher to finish washing the Ninja™ so I could go on to the next test, I looked around for another project to inspire me.&nbps; I saw the bananas sitting there that I had purchased 3 days ago and decided I had better get them peeled and frozen.

You may recall from the original weigh in that the bunch of organic bananas weighed 36 ounces.
Today, about 3 days later, they weigh in at 34 ounces.  Allowing them to ripen has resulted in the loss of 2 ounces.  That is 2 ounces I paid for but will never be able to use.  Now, what about after peeling?
Naked, the bananas weigh in at 23½ ounces.  That is a loss of 12½.  Again referring back to the original post, I paid 69¢ a pound for this bunch of bananas, or a total of $1.53.  Dividing that $1.53 by the remaining ounces means I actually paid $1.04 per pound for usable banana, and the percentage of waste is 34.7%.  So, how does this compare to conventional banana?
Well, after 3 days, the conventional bananas were still very green and not ready to be peeled.  However, they, too, have lost some weight.  Originally coming in at 32¼ ounces, they now weigh 31½.  Not much weight loss yet, but they are also not as ripe as the organic bananas.  I guess I will have to wait a few more days before I can peel and weigh these bananas and then post a conclusion to the banana experiment.

As always, I welcome your comments.  Click on the Comment link below; it may say "No" or have a number in front of it.

16 December 2013

Ninja smoothie test

I am testing the Ninja™ Master Prep™ Professional (their italics, not mine), the ultimate food and drink maker, model #QB1004 30.  In this post, I am specifically using the 48-ounce pitcher, the largest unit of this 3-unit set.  This is the 6-blade container the company claims can turn ice into snow, so I am going to try it on a frozen banana smoothie.

At first, I thought the 6-blade design would interfere with the frozen bananas, but the slipped between the blades just fine.  The other ingredients include milk, cocoa powder, and ground almonds.  To see the recipe, click this link.

I pulsed the machine and had an immediate problem.  Liquid squirt out of the splash guard's covered pour spout.  How can such a design flaw not have been noticed this long?  What, did they design it just to make snow and not smoothies?  Immediately disappointed with the machine, I pulsed a few more times to get the frozen bananas chopped up.  I then ran the machine for about 15 seconds and then again for about 15 seconds. I noticed there was still some frozen banana floating in the mixture, so I ran it a third and fourth time.  After this, there appeared to be no more banana floating in the shake.

The first thing I noticed looking through the clear plastic of the pitcher was that the mixture was not very frothy.  It did not seem to have gained any volume, which the recipe does in my Oster Fusion smoothie machine.  Well, that just means it won't deflate during transport, which I consider a benefit.  On pouring out the smoothie, I noticed it had a thick lumpy texture.  These weren't clumps of anything; it just poured lumpy.  This is just an observation, not a complaint.

Drinking the smoothie through a straw produced two observations.  The first was that the texture was more like a shake than a traditional smoothie.  I like shakes, so I did not consider this a failure, only a difference.  The second observation was that there were still chunks of almond remaining in the drink.  With claims of making snow from ice, I consider the presence of almond chunks to be a failure on the part of the machine.

For clean up, it felt much easier than the Oster Fusion.  There was nothing to unscrew, there was no gasket to deal with, and there were fewer overall parts.  The hardest part to clean was the 6-blade stem.  I think I will buy a brush to make it easier next time.  I did notice another design flaw, however.  For people using a dishwasher to clean the Ninja™, there are many nooks and crannies in the larger parts where water will accumulate.  In fact, the entire bottom of the pitcher is recessed.  This, and the splash guard, will fill with water during the washing process.  You will have to wipe them out even after dishwashing.

Overall, the result of using a Ninja™ to make a smoothie are disappointing but not a real failure.  The consistency of the final product is more like a shake than a smoothie.  The two glaring problems are the remaining chunks of nut, which can possibly be fixed by running the machine more, and the leakage from the splash guard pour spout during operation.  That, more than anything else, make me want to go back to using my Oster Fusion.

As always, I welcome your comments.  Click on the Comment link below; it may say "No" or have a number in front of it.

15 December 2013

What I didn't know I didn't know about pie crust

I thought the first task in researching pie crust would be to discover what a basic pie dough contains.  However, I did not know there were different kinds of pie crust.  Yep, it is even more complicated than making the crust; you have to decide which type of crust is best for your purpose.  There is your well-known flaky crust, which is divided into long-flake and short-flake (Gisslen 287), and there is what is known as short crust.  These are two distinct outcomes (Tanis, “A Good Quiche”) that use the same set of ingredients.

The two major ingredients seem to be flour and fat.  The flour ranges from just “flour” (Perelman) to all-purpose flour (“Basic Pie Dough” 30; Tanis “Basic”) to whole wheat flour (Leake) to pastry flour (Gisslen 289).  For fat, most recipes use butter.  However, a few specify unsalted butter (Greenspan 172; Mollenkamp), while a few others advocate shortening instead (Drummond; Gisslen 289).  In 1872, the fat of choice was butter with soda and cream of tartar or “lard, sweet and firm (Harland 350-352).”  The use of lard still existed in 1896, and some alternatives at that time were “cocoanut” butter and a shortening known as cottolene (Farmer 386), made of beef tallow and cottonseed oil (“Cottolene”).  This produced what was called a paste (Farmer 386) rather than a dough.  Gisslen also speaks of a paste, where the flour and fat are blended completely (287).  In addition to the fat, some sort of liquid is also needed to help develop the wheat gluten, so most recipes include cold or ice water (Dana; Gisslen 289; Tanis), although this is sometimes replaced by cold milk (Winkler) or alcohol (Perelman).  Other repeated additions include salt and sugar (“Basic Pie Dough” 30).  To my surprise, egg does make an appearance in a few recipes (Drummond; Greenspan 172) and is referred to as enriched pie pastry (Gisslen 289).  One very interesting recipe is called “transparent crust” and consists of flour, butter, and egg yolk; but it is only recommended for “tartlets or pâtés (Harland 353).”

Which of these ingredients causes the flakiness of a pie crust?  It is the fat.  As the fat melts in the oven, steam escapes causing air pockets that result in flakiness (Perelman).  Walnut-size pieces of fat create what is called long-flake, while hazelnut-size pieces create what is called short-flake (Gisslen 287).  While visible chunks of fat usually equal flake, another recommended trick is keeping the fat cold for as long as possible (Perelman; Tanis, “A Good Quiche”).  Some recipes even instruct refrigerating the dough again before rolling (Gisslen 289).  When it comes to which fat to use, it is really a matter of choice because chemically a fat is a fat.  Even though Drummond claims “butter just will not work,” Perelman says “it won't matter which fat you use.”  In fact, some of what have to be short-crust recipes use liquid oil (Elizabeth) or melted butter (Leake).  However, these are for quiche crusts, so they don't necessarily have to be flaky, do they?

So, what is the difference between a not-flaky short crust and a flaky crust?  It is all in how well blended, or unblended as the case may be, the fat and flour are.  According to Gisslen, one should only cut in the fat until “the shortening is the size of peas or hazelnuts” to achieve a flaky pie crust (287).  This echoes Perelman's assertion that the butter should be visible.  The short crust, in contrast, is blended until “the mixture looks like coarse cornmeal.”  There are many pie dough recipes which instruct mixing the ingredients to a coarse meal appearance (Tanis, “A Good Quiche”).  These are technically short crusts, also known as mealy pie dough (Gisslen 287).  And when should one choose a short crust?  Short crusts are “less likely to absorb moisture from the filling and become soggy (Gisslen 287),” so they are favored for bottom crusts of fruit pies and other soft fillings.  Pre-baking either type of crust diminishes the chance of mushiness (Gisslen 287; Tanis, “A Good Quiche”).

As for whether to make the dough by hand or with a food processor or other machine, Perelman states "it is so much harder to overwork your dough and overmix your butter by hand than it is when you use the food processor."  Besides, making the dough by hand burns calories.  It is said 2 hours of baking activities, such as rolling and kneading, can burn 471 calories (Novak).  You want a reason to reward yourself with that high-calorie crusted treat, then do it without the machine!  (Okay, you fellow math geeks out there have already figured out that comes to 3.925 calories per minute, so a 5-minute pie crust would burn only 19.625 calories, and there is no such thing as a 19.625-calorie slice of pie. Shhhh!)

By now you are wondering where on earth I am going with all this.  To do a good crust, one should know the options.  If I have discovered all the options above, my choices are actually quite simple.  By all accounts, I should be able to achieve a pie crust using just flour and butter, so that is going to be my starting point.  As I progress, I will add other ingredients, starting with salt and ice water, until I obtain the desired outcome.  I would like something flaky and not soggy, so pre-baking is a necessity.  And I have no desire to pull out a food processor, so the dough will be made using a pastry cutter, although it would be interesting to see what a Ninja™ Master Prep™ Professional would do.  My Facebook friend says she uses this recipe, although I like this recipe as a better starting point.  With the exception of water in the former and sugar in the latter, they are quite similar in ratio.

So that is my dissertation on pie crust.  Next time I have a hankering for a quiche, I will just whip out my flour and butter and create another post.

As always, I welcome your comments.  Click on the Comment link below; it may say "No" or have a number in front of it.

References:

“Basic Pie Dough.” Everyday Food Nov. 2006: 30-31. Print.

“Cottolene.” Wikipedia. Wikimedia Foundation, Inc, 19 May 2013. Web. 15 Dec. 2013.

Dana. “Butter Flaky Pie Crust Recipe.” Allrecipes.com. Allrecipes.com, n.d. Web. 15 Dec. 2013.

Drummond, Ree. “Perfect Pie Crust.” The Pioneer Woman. The Pioneer Woman | Ree Drummond, 22 Dec. 2007. Web. 15 Dec. 2013.

Elizabeth. “Quick N Easy Quiche Crust.” Food.com. Scripps Networks, LLC, 27 Jan. 2002. Web. 15 Dec. 2013.

Farmer, Fannie M. The Boston Cooking-School Cook Book. 1896. Reprint. “The Original Fannie Farmer 1896 Cook Book.” Italy: Ottenheimer Publishers, Inc., 1998. Print.

Gisslen, Wayne. “Pies.” Professional Baking. 5th ed. Hoboken, N.J: John Wiley, 2009. 286-315. Print.

Greenspan, Dorie. “Mushroom-Shallot Quiche.” Bon Appétit Oct. 2006: 172. Print.

Harland, Marion. Common Sense in the Household: A Manual of Practical Housewifery. 1872. Reprint. Birmingham, AL: Oxmoor House, 1985. Print.

Leake, Lisa. “Recipe: Quiche with a Super Easy Whole-Wheat Crust.” 100 Days of Real Food. 100 Days of Real Food, 26 Apr. 2010. Web. 15 Dec. 2013.

Mollenkamp, Aida. “Basic Pie Dough Recipe.” CHOW. CBS Interactive Inc., 26 Nov. 2008. Web. 15 Dec. 2013.

Novak, Sara. “7 Activities to Counteract the Thanksgiving Calorie Overload.” TLC. Discovery Communications, LLC, n.d. Web. 15 Dec. 2013.

Perelman, Deb. “Pie crust 102: all butter, really flaky pie dough.” smittenkitchen.com. Smitten Kitchen, LLC, 24 Nov. 2008. Web. 15 Dec. 2013.

Tanis, David. “Basic Short-Crust Pastry.” The New York Times. The New York Times Company, 24 Oct. 2013. Web. 15 Dec. 2013.
  --  "A Good Quiche Needs Good Pastry." Diner's Journal. The New York Times Company, 19 Oct. 2012. Web. 15 Dec. 2013.

Winkler, Katy. “Quiche with a Perfect Crust.” Food o' del Mundo. N.p., 15 Nov. 2009. Web. 15 Dec. 2013.

14 December 2013

Ninja chopper test

I am testing the Ninja™ Master Prep™ Professional (their italics, not mine), the ultimate food and drink maker, model #QB1004 30.  In this post, I am specifically using the “bowl”, the smallest unit of this 3-unit set.  It is basically meant to be used as a chopper, as in chopping onions, so that is what I used to test it.
Here you can see the chopper bowl with 3 ounces of red onion in it.  The first two things I noticed that aren’t really in the owner’s guide are the difficulty of assembly of the unit.  The guide simply says, “Place the splash guard on the bowl.” What it does not say is there is only one way the splash guard will fit.  Without this information, I tried to push the splash guard into place.  It took me several tries before I realized the splash guard must be turned to align with parts of the bowl before it will fit in place.  I also could not get the power head to fit onto the splash guard.  After the problem with the splash guard, I decided to keep rotating the power head until it fit into place.  Therefore, there is a mark against the Ninja™ for omissions from the owner’s guide.

With the onions, blades, splash guard, and power head in place, I pulsed the unit 4 times.
If you look closely at the picture, you will see a few larger chunks in the upper portion of the picture.  What you cannot really see is the onion at the bottom of the bowl is almost liquified.  This may diminish as the blades dull with use, but it is definitely too much power to simply chop an onion.  Also, no matter how hard I tried, I could not get all the onion pieces out of the machine and into my dish.
Upon adding the chopped onion to my dish, I discovered more nonuniform pieces, as pictured above.  The smaller nearly liquified pieces browned so quickly in my sauté pan they almost burned, while the larger pieces remained on the raw side.  Had I not been raised eating raw chopped onion as a child, this may have bothered me more than it did.

In conclusion, the Ninja™ is a powerful machine with some frustrating instruction flaws.  Its performance on chopping is simultaneously overzealous and inconsistent.  Given the choice between using a chef’s knife and assembling and washing 4 machine parts, the waste (albeit small), and having to use a chef’s knife to make the onion small enough to fit the machine anyway, I will select the knife over the Ninja™ every time, at least for chopping onions.  Garlic might be another story, though.

The next test I will perform will be of the 48-ounce pitcher to make a smoothie-style drink.

As always, I welcome your comments.  Click on the Comment link below; it may say "No" or have a number in front of it.

Ninja Master Prep Pro has arrived!

The Ninja™ finally arrived!
This is the Ninja™ Master Prep™ Professional (their italics, not mine), the ultimate food and drink maker, model #QB1004 30.  (There is a model #QB1004CO 30, but I have yet to find the difference.)  Unfortunately, the Ninja™ is made in China, which accounts for it being the second-least-expensive food processor I could find.  (Note, there are less expensive food choppers, including the Ninja™ food chopper.  However, this was the least-expensive machine I could find that would make peanut butter.)  This set comes with the following parts:
This is what is called the “master pod” or “power head”.  It is the motor part of the machine, what would be the bottom of a normal blender.  It has only one button.  The large silver piece, off of which my flash is reflecting, is a pulsing switch.  Press it, and the motor runs.  Release it, and the motor stops.  The Ninja™ website states that the motor should never be run more than 20 seconds at a time, although the owner’s guide puts it at 15 seconds.  Longer stints could burn out the motor.  By the way, this is the only part that CANNOT BE PUT IN A DISHWASHER; all other parts are top-shelf dishwasher safe.
This is the pitcher splash guard.  It is designed to be used with the 2 pitchers that accompany this set.  One places it on top of the pitcher and then places the motor on the splash guard.  The guard has an “easy-flip” pour spout that can be opened to pour drinks.
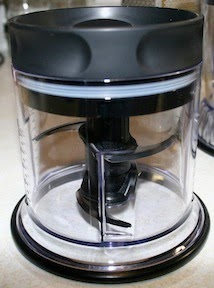
This is the bowl.  It holds up to 2 cups, has 4 blades, and comes with its own splash guard.  The blade shaft can be separated into 2 pieces, although there is no explanation in the owner’s guide as to why.  I suppose it is in case you have more stuff to chop.  The owner’s guide also says to never put in more than 2 cups of dry or 1 cup of liquid ingredients.  This piece is what was used in the YouTube video to make peanut butter.  In the video, peanut butter is achieved within 54 seconds, although they do run the machine a second time to get a creamier texture.
This is the smaller of the 2 pitchers.  It holds 40 ounces.  The blade shaft is removable, but it does not separate into 2 piece, like the bowl blade does.
This is the larger of the 2 pitchers.  It holds 48 ounces and has a single-piece 6-blade shaft.  Each of the pitchers comes with a Tupperware®-style cover.  It can, thus, be used for storage when the blade is removed.  All three bowls have a rubberized bottom to prevent slippage when the motor is running, although one should always keep a firm grip in the machine while in operation (so warns the owner’s guide).
The paperwork that comes with the machine consists of a yellow blade warning, a request to call with problems instead of returning the machine, a quick start guide with 1 recipe for each bowl/pitcher, and the owner’s guide.  (I have created a searchable .pdf file of the owner’s guide, which is COPYRIGHT © EURO-PRO OPERATING LLC 2010, and have saved it here.)  The recipes are a coffee-chocolate smoothie without ice, fresh tomato salsa, and “onion chop”, which is basically a tutorial on chopping an onion.  The owner’s guide is 16 pages long, with 2 of these pages being the registration card to cut off and mail to Canada.  (I wonder if I need an international stamp for that.  Well, I have to make a trip to the post office anyway.)

So, now all that there is left to do is wash the machine.  Upon putting the parts into my dishwasher, I discovered this . . .
That is how little space I have between the top of the larger pitcher and the inside of my dishwasher, so caveat emptor that it may not fit in the top shelf of your dishwasher.  Now, on to the peanut butter test!

As always, I welcome your comments.  Click on the Comment link below; it may say "No" or have a number in front of it.

08 December 2013

Almond Butter, test #1

I started with 360 grams (12¾ oz) of raw almonds, which measured to approximately 2½ cups.  After blanching and peeling the almonds, I put them in my Black & Decker food processor with the chopping blade and let her rip.

The first thing I need to add to the recipe card is earplugs.  That thing was loud!  The nuts got to the first stage, powdered, nicely within about 5 minutes.  After several scrapings of the bowl, though, nothing more seemed to happen.  The powder was not moving.  I shook the processor to get the powder to fall into the blade, but it appeared to just be thrown out again.  I ran the processor for a total of 35 minutes with no progression to the second stage.

To see if making butter was even possible with almonds, I poured the entire thing into my Oster Fusion smoothie blender and ran it.  Very quickly the powdered nut at the bottom of the blender butterized.  Unfortunately, there was no movement of the nuts above into the blade, as the butter created a barrier.

Off to the Internet I went to see what my problem could be.  Only two clues presented themselves.  Most of the recipes use roasted nuts and I used raw.  I am not sure if that will make a difference or not.  However, it is something I will have to test in the future.  The other clue is the machines used.  One person was using a $600 KitchenAid food processor; another was using a professional Vitamix blender.  It is a possibility, therefore, that the machine has something to do with the process.

Searching the Internet for an inexpensive food processor that is guaranteed to make nut butter is not an easy task.  Eventually, I just settled on looking at processor prices.  On Target.com, the second-least-expensive food processing system was the Ninja#8482; Master Prep™ Professional (their italics, not mine).  For those of you who do not know, a Ninja is basically a blender with the motor at the top instead of the bottom.  The containers also come with multiple blades.  The question, then, was would this machine make a nut butter.  Thank God/Gaia/Zeus/Odin/Cthulhu for YouTube.  Somebody actually posted a video of them making peanut butter using the Ninja™.  It took under a minute, although they did use an oil to speed the process.  Because of this video, I wrote to the company to ask if the machine did, indeed, make peanut butter.  They replied that they could not guarantee it since the machine was a chopper and not a food processor.  The video and the price convinced me to give it a try.  I am really hoping it works, because I can then replace two countertop machines with one that fits into a cabinet.

I have placed my order with Target, which had a $10 lower price than Wal*Mart, and got a 2-year Target warranty just in case I blow out the motor making nut butters.  Since it does have a blender pitcher, I will also attempt to use it to make my smoothies; they advertise the machine can make snow from ice cubes.  It is supposed to arrive around the 12th.  At that time, I will be able to get the ingredients for test #2.

As always, I welcome your comments.  Click on the Comment link below; it may say "No" or have a number in front of it.

05 December 2013

Almond Butter, the why

The big question is, of course, why make almond butter.  The answer is simply frugality.  Making almond butter costs pennies per ounce, while buying a jar in the grocery store can cost dimes, or even dollars.  There is a big savings to be had by making almond butter at home.  According to one source, a cup of home-made almond butter costs approximately $3.75, while supermarket brand MaraNatha comes in at $6.40 a cup (Reese).  At a savings of $2.65 per cup, I would need to make 22.2 cups of almond butter to pay for my new food processor (Ninja).  At 2 tablespoons per day (1 with breakfast and 1 in my smoothie) 6 days a week (when I am exercising), my savings start in the 30th week.

Another benefit is creating personal mixtures.  How about macadamia almond or peanut pecan?  The possibilities are endless.  Those are a couple good reasons to try making almond butter at home.

A third benefit is control of ingredients.  That MaraNatha almond butter contains added sugar and palm oil, which is 50% saturated fat and increases the risk of heart disease (Robb-Nicholson).  Other sites insist palm oil production is bad for the planet due to rainforest deforestation and orangutan habitat loss (Thompson) as well as use of child labor (Skinner).

The fourth, and most important in my humble opinion, is the right so say “I made it.”  I am so tired of hearing people say “Can't you just buy that?”  When the world collapses, you can come to me when you want some peanut butter, okay?

Now thoroughly self-convinced that making almond butter has value, it is on to looking into the process.

As always, I welcome your comments.  Click on the Comment link below; it may say "No" or have a number in front of it.

References:

"Ninja Master Prep Professional-Black/Silver." Target. Target Brands, Inc., n.d. Web. 5 Dec. 2013.

Reese, Jennifer. Make the Bread, Buy the Butter: What You Should (and Shouldn't) Cook from the Scratch to Save Time and Money. New York: Free Press, 2012. Print.

Robb-Nicholson, Dr. Celeste. “By the way, doctor: Is palm oil good for you?.” MSN Healthy Living. Microsoft, 7 Oct. 2013. Web. 5 Dec. 2013.

Skinner, E. Benjamin. “Indonesia's Palm Oil Industry Rife With Human-Rights Abuses.” Bloomberg Businessweek (businessweek.com). Bloomberg L.P., 18 July 2013. Web. 5 Dec. 2013.

Thompson, Claire. “Palm oil: Bad for workers as well as orangutans.” Grist. Grist Magazine, Inc., 25 July 2013. Web. 5 Dec. 2013.

Almond Butter, an introduction

Two of the recipes I am experimenting with for my exercise program include almond butter.  Well, one uses almond butter and the other uses nut butter.  I enjoy almonds, so I might as well use almond butter.  When one searches the Interweb, one finds hundreds of easy-to-make recipes for almond butter.  It's almonds, salt, and sweetener with optional oil.  Put it all in a food processor.  Viola, you have almond butter.  Simple, right?

WRONG!

Apparently, there is more to making a nut butter at home than people are letting on.  Therefore, I will chronicle my adventures with nut butter in a series of blogs.


As always, I welcome your comments.  Click on the Comment link below; it may say "No" or have a number in front of it.